S’mores Ice Cream Cookie Sandwiches {Gluten Free Optional}
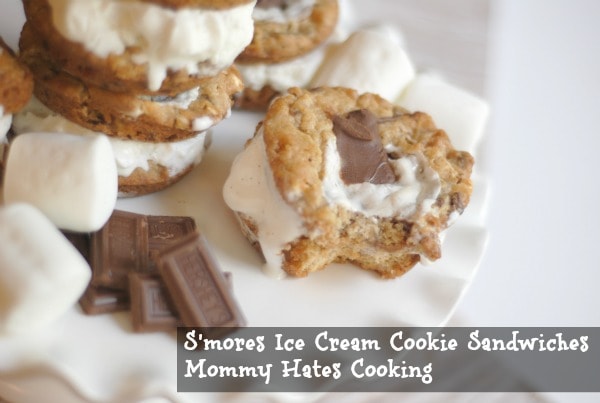
Most of you all know…I’m a cookie addict.
I could bake them and eat a whole batch or maybe 2 or 3 batches in a day.
That’s exactly why I don’t bake them often!
Some days…they call for them though. Those days when my daughter decides to scream all day or randomly spit up all over me meanwhile my son is coloring all over himself because that’s just better than paper….those days call for cookies…LOTS of cookies!
This past week I spotted this fabulous recipe for Deep Dish S’mores Cookies over on Cookies & Cups! Her blog name says it all right? It’s like heaven…only most of the time I just look from afar, my waist thanks me for it while my taste buds are screaming for cookies.
Back to those cookies, I decided to remake those Deep Dish S’mores Cookies only I had a few challenges…first, I wanted them to be gluten free.
Let’s face it if I make Deep Dish S’mores Cookies, I better be able to eat them!
Then, I also wanted them to be a cool treat for these crazy hot Oklahoma days! What does that mean?
Ice Cream.
What could possibly be better than S’mores cookies with a heaping pile of ice cream? Nothing friends, nothing.
I followed her recipe including using the muffin top pan; however, I also used a square brownie pan from Pampered Chef, both worked fabulously!
The main changes I made to make this gluten free was to replace the flour with gluten free all purpose flour and replace the graham cracker crumbs with Enjoy Life Vanilla Graham Crunchy Cookies. So far those cookies are my favorite replacement for graham crackers.
The result?
Sweetness overload…pure perfection.
A few things to remember and make the process easier, first be sure your cookies are completely cooled. That’s a big deal.
Next, you want to have the ice cream softened and work quickly.
When I made the recipe I topped 1/2 of the cookies with the marshmallow and chocolate and left the other have plain on top because that’s where the ice cream would go.
I slathered on vanilla ice cream to about an inch thick on the plain top cookie, then I just placed the other cookie on top. I also put foil underneath them so that once the sandwich was built I could foil wrap it and put it back in the freezer for about 6-8 hours to harden.
Delicious, right?
When they come out of the freezer several hours later, I like to let mine soften just a bit then dig in. Of course, if you are taking these outside in the heat…they’ll melt quick so softening probably would not be a good idea.
Are you drooling enough now? Ready to dig in?!
Remember just like it says in the original recipe, you do not have to use a muffin top pan, you can do these on a cookie sheet as well, just make them a little thicker to get that deep dish taste.
I am entering this S’mores Ice Cream Cookie Sandwiches in the Creative Recipe Contest hosted by Confessions of a Cookbook Queen and Cookies and Cups! Head over and check out even more delicious recipes!
Have you visited our Products list? Be sure and check out Hegub Products and Services.
Need more recipe ideas? Check out the Recipe Index by Hegub.
Ingredients
Cookie Sandwich
Topping & Filling:
Steps
- 1
Preheat the oven to 350*
- 2
Spray the muffin top pan with cooking spray and set aside.
- 3
Using a stand mixer, begin by creaming together the butter and sugar then add in the eggs and vanilla until it's smooth.
- 4
Next, keeping the mixer on a medium to low speed add in the graham cracker crumbs, baking soda, and salt until well combined.
- 5
Turning the mixer to low, add in the flour until combined.
- 6
Next stir in or hand mix the Marshmallow Bits and milk chocolate.
- 7
Fill each muffin top tin to the top, pressing it around the pan evenly.
- 8
Bake them for 8 minutes then remove them and add the marshmallow to 1/2 of the cookies. (For instance, if you are baking 12, only add it to 6 of them.)
- 9
Put them back in the oven for an additional 4-5 minutes until the marshmallow is slightly golden.
- 10
Remove them from the oven and place the milk chocolate piece next to each marshmallow.
- 11
Let them cool for 5-10 minutes then remove them from the pan by loosening the edges with a knife. If possible using a small spatula also helps to remove them easily.
- 12
Let them cool completely on a wire rack.
- 13
Once they are completely cooled take a cookie that is topped with the marshmallow and chocolate and one that is not and place them on a piece of foil. The foil should be large enough to wrap around the cookie once it's filled with ice cream.
- 14
Place softened ice cream about 1 inch thick on the plain cookie.
- 15
Place the cookie that has the toppings on top of the ice cream to form the sandwich.
- 16
Immediately foil wrap it and place it in the freezer.
- 17
Repeat this process for all remaining cookies and store them in the freezer for 6-8 hours to fully harden.
Filed under Recipes Gluten Free Dessert Ice Cream