
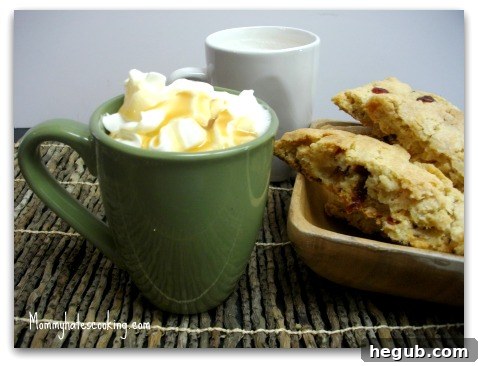
After sharing the delightful recipe for our Milky Way Mocha, a rich and indulgent coffee creation, I knew it was absolutely essential to introduce you to another beloved homemade beverage: my signature Vanilla Caramel Latte. This luxurious drink offers the perfect blend of sweet vanilla and buttery caramel, transforming your kitchen into your favorite coffee shop without the hefty price tag. But why stop at just a delicious drink? To elevate this experience, I’ve also crafted an irresistible batch of White Chocolate Cranberry Biscotti, designed to be the ultimate companion to your freshly brewed latte. Get ready to awaken your senses and treat yourself to a gourmet café experience right in your own home with these easy-to-follow recipes.
The Ultimate Homemade Vanilla Caramel Latte: Your Daily Indulgence, Simplified
There’s something incredibly satisfying and rewarding about recreating your favorite coffee shop drinks at home. Not only does it offer significant cost savings over time, especially if you’re a daily latte drinker, but it also allows for complete customization to suit your personal taste preferences. Imagine crafting a perfect Vanilla Caramel Latte exactly to your liking – whether you prefer an extra drizzle of rich caramel, a specific type of milk (dairy or plant-based), or a less sweet profile, making it yourself means every single sip is precisely how you want it. Ditch the long lines and embrace the comfort of brewing and frothing in your own kitchen. Let’s dive into creating this comforting and utterly delicious beverage that promises to brighten any morning or afternoon.
What You’ll Need: Key Ingredients for Your Decadent Latte
- Caramel Sauce: About 1/4 inch at the bottom of your mug, or adjust to your desired level of caramel sweetness and intensity. Opting for a high-quality caramel sauce will make a noticeable difference in the overall flavor profile of your latte.
- Milk: 1 cup of Skim Milk is used in the original recipe, but feel completely free to substitute with whole milk for a richer texture, or almond milk, oat milk, or soy milk for a dairy-free alternative. Each milk type will impart a slightly different flavor and frothing consistency.
- Vanilla Powdered Creamer: 2 tablespoons. This adds a convenient and consistent vanilla flavor along with a touch of sweetness. If you don’t have powdered creamer, you can substitute with 1-2 tablespoons of vanilla syrup or 1/2 teaspoon of vanilla extract combined with a bit of sugar.
- Espresso: Freshly brewed, strong espresso shots are the heart of any true latte. The quality and intensity of your espresso will profoundly impact the final taste, so use your favorite beans.
- Whipped Cream: An optional but highly recommended luxurious topping for an extra touch of decadence.
- Extra Caramel Drizzle: For garnishing your finished latte, if desired.
Essential Equipment for Brewing and Frothing
While an espresso machine certainly simplifies the process of brewing strong coffee and steaming milk, don’t worry if you don’t own one! There are excellent and accessible ways to achieve a fantastic homemade latte without specialized, expensive equipment.
- Coffee Mug: Of course, you’ll need your favorite mug to enjoy your beautifully crafted beverage.
- Steaming Pitcher: A stainless steel frothing pitcher is the ideal tool if you have an espresso machine equipped with a steam wand, allowing for precise control over milk steaming.
- Espresso Machine: A good quality espresso maker, such as the DeLonghi EC155, makes the brewing process effortless and produces rich, crema-topped espresso shots that are essential for an authentic latte experience.
- Spatula or Spoon: Useful for holding back the thicker milk foam when pouring and for gently stirring your latte.
- (Alternative) Microwave-Safe Mug or Small Saucepan: If you’re opting for a method without an espresso machine, these are perfect for heating milk.
- (Alternative) Handheld Milk Frother: An affordable and effective tool for creating excellent foam from heated milk without a steam wand. A French press can also be used to froth milk!
- (Alternative) Strongly Brewed Coffee: If you don’t have an espresso machine, prepare very strong brewed coffee using your drip coffee maker, French press, or AeroPress as a robust substitute for espresso.
Step-by-Step Guide to Crafting Your Perfect Homemade Vanilla Caramel Latte
- Prepare Your Mug with Caramel: Begin by generously drizzling your preferred amount of caramel sauce into the bottom of your chosen coffee mug. A layer of about a quarter-inch is a good starting point, but feel free to adjust based on how sweet and caramel-rich you like your latte. This foundational layer will gently melt into the hot liquids, ensuring every sip is infused with a delightful, buttery caramel note.
- Steam and Flavor the Milk: In your steaming pitcher (or alternative heating vessel), combine 1 cup of skim milk with 2 tablespoons of vanilla powdered creamer. If using an espresso machine’s steam wand, carefully steam the milk until it reaches approximately 140°F (60°C). The milk should become hot, beautifully frothy, and subtly sweetened with a distinct vanilla aroma. If you’re without a steam wand, gently heat the milk and creamer in a small saucepan over medium heat, stirring continuously, until hot but just before boiling. Alternatively, you can microwave it in a microwave-safe mug for 60-90 seconds, then froth it manually.
- Brew the Espresso: While your milk is steaming or heating, brew your espresso shots directly into the caramel-lined mug. The heat from the freshly brewed espresso will immediately begin to warm the caramel, allowing it to gently dissolve and release its rich, inviting flavors. For a standard size latte, two shots of espresso are typical, but you can adjust this based on your caffeine preference and desired coffee strength. If you are using strongly brewed coffee as a substitute, pour about 1/2 to 3/4 cup into the mug at this stage.
- Combine and Layer: Once your vanilla-infused milk is perfectly steamed and frothy, gently pour it over the espresso in your mug. For an elegant, layered effect reminiscent of a professional barista, you can use a spatula or a large spoon to hold back the thicker milk foam, allowing the hot, steamed milk to pour in first, then carefully topping it with a generous dollop of the creamy vanilla foam.
- Stir and Personalize: Give your latte a gentle stir to thoroughly incorporate the caramel, espresso, and vanilla-frothed milk, ensuring a harmonious blend of flavors. For the ultimate touch of indulgence, crown your creation with a swirl of whipped cream and an additional artistic drizzle of caramel sauce. Your gourmet Vanilla Caramel Latte is now complete and ready to be savored!
No Espresso Machine? No Problem! Achieving a Great Latte Without the Gear
Do not let the absence of a fancy espresso machine deter you from enjoying a delicious homemade latte. You can still achieve a fantastic, café-quality result with a few simple, accessible adjustments and tools you likely already have in your kitchen:
- Heat and Flavor Your Milk: Combine your chosen milk (e.g., skim, whole, oat) and vanilla powdered creamer (or vanilla syrup/extract) in a microwave-safe mug or a small saucepan. Heat until the milk is very hot but not yet boiling, stirring continuously to fully dissolve the creamer and infuse the vanilla flavor.
- Froth the Milk (Optional but Highly Recommended): To achieve that signature frothy texture, use a handheld milk frother. Alternatively, you can vigorously whisk the hot milk by hand, or even shake it in a jar with a tight-fitting lid for 30-60 seconds until a good amount of foam appears.
- Assemble Your Delicious Latte: First, pour the caramel sauce into the bottom of your serving mug. Next, add 1/2 to 3/4 cup of strongly brewed hot coffee (prepared via drip, French press, or any preferred method). Finally, carefully pour in your heated and frothed vanilla milk. Give it a gentle stir and, if desired, top with whipped cream and an extra caramel drizzle for that professional finish.
Expert Tips for Crafting the Perfect Homemade Latte
- Optimal Milk Temperature is Key: Aim for milk steamed or heated to around 140-150°F (60-65°C). This temperature range ensures optimal sweetness, creaminess, and flavor of the milk. Overheating can scorch the milk, leading to an unpleasant, “burnt” taste.
- Invest in Quality Ingredients: The foundation of any great drink is its ingredients. Using fresh, high-quality espresso beans (or strong coffee) and a good, flavorful caramel sauce will significantly elevate the taste and overall experience of your latte.
- Practice Makes Perfect Frothing: Achieving perfect microfoam (tiny, silky bubbles) takes a bit of practice. When using a steam wand, listen to the subtle sounds of the milk incorporating air, and observe its texture as it expands.
- Master Sweetness Control: The beauty of homemade is customization. Adjust the amount of caramel and vanilla creamer or syrup to precisely match your preferred sweetness level. Remember, you can always add more sweetener, but you can’t easily remove it!
Creative Variations & Customizations: Explore New Latte Flavors!
The true joy of making beverages at home is the boundless freedom to experiment with flavors and ingredients. Here are a few inspiring ideas to elevate your next latte creation beyond the classic Vanilla Caramel:
- Nutty Twist: Introduce a tablespoon of hazelnut, almond, or pecan syrup along with the vanilla for a delightful nutty undertone.
- Mocha Dream: For chocolate lovers, drizzle chocolate sauce into the mug before the caramel, creating a luxurious “Caramel Mocha Latte.”
- Seasonal Flavors: Embrace the seasons! Incorporate pumpkin spice syrup in the fall, peppermint syrup during the winter holidays, or a hint of lavender syrup for a spring delight.
- Dairy-Free Delight: Easily make your latte plant-based by using your favorite dairy-free milk like oat milk (which froths exceptionally well), almond milk, or soy milk.
- Sugar-Free Option: If you’re managing sugar intake, opt for sugar-free caramel sauce and sugar-free vanilla syrup to reduce the overall sugar content without sacrificing flavor.
Crafting Exquisite White Chocolate Cranberry Biscotti: The Perfect Companion
What could possibly pair better with a warm, comforting, and customizable Vanilla Caramel Latte than a perfectly crisp biscotti? Biscotti, with its distinctive twice-baked crunch, is an Italian classic specifically designed for dipping. Its sturdy, dry texture allows it to absorb just the right amount of liquid from your coffee without crumbling, making it the ideal partner for your morning brew or afternoon tea. While many traditional recipes often feature classic add-ins like almonds or chocolate chips, this White Chocolate Cranberry Biscotti offers a delightful and vibrant twist, blending the rich, creamy sweetness of white chocolate with the tart, chewy burst of dried cranberries. It’s an elegant, satisfying, and surprisingly simple-to-make treat that is perfect for sharing with loved ones (or, let’s be honest, keeping all to yourself!).
Essential Ingredients for Your Delicious Biscotti Batch
I based this incredibly versatile biscotti recipe on a fantastic Chocolate Chip Biscotti recipe, making simple yet impactful substitutions to create this delightful flavor profile.
- All-Purpose Flour: The fundamental building block and foundation of your biscotti structure.
- Granulated Sugar: Provides essential sweetness and contributes to the crisp texture of the biscotti.
- Baking Powder & Salt: Baking powder acts as a leavening agent, giving the biscotti a slight lift, while salt enhances all the flavors.
- Large Eggs: Crucial for binding the dough together and adding richness, contributing to the overall texture.
- Vanilla Extract: Essential for a warm, inviting, and aromatic base flavor that complements both the white chocolate and cranberries.
- Melted Butter: Adds tenderness, moisture, and a rich, buttery flavor to the dough.
- White Chocolate Chips: 1/2 cup (or more, if you’re a devoted fan of white chocolate!). These melt beautifully during baking and provide pockets of creamy, sweet indulgence.
- Dried Cranberries: 1/2 cup. Their vibrant tartness provides a wonderful counterpoint to the sweetness of the white chocolate, creating a balanced and addictive flavor combination that also pairs exceptionally well with coffee.
Kitchen Equipment You’ll Need for Biscotti Baking
- Large Mixing Bowl: For efficiently combining all your dough ingredients.
- Whisk and Spatula: Necessary tools for mixing your dry and wet ingredients and folding in your chosen add-ins.
- Baking Sheet(s): Ensure you have at least one large baking sheet, preferably lined with parchment paper for easy cleanup and non-stick baking.
- Sharp Knife: An indispensable tool for cleanly slicing the partially baked biscotti logs. A serrated knife often works best.
- Wire Rack: For cooling the biscotti completely after both baking stages, ensuring maximum crispness.
Baking Your White Chocolate Cranberry Biscotti: The Signature Two-Step Process
The unique, famously crisp texture of biscotti comes from its distinct “twice-baked” method. Don’t be intimidated by this; the process is actually much simpler than it sounds and is key to creating these delightful Italian cookies!
- Prepare the Dough: Begin by preheating your oven to 350°F (175°C). In a spacious large mixing bowl, thoroughly whisk together all the dry ingredients: flour, granulated sugar, baking powder, and salt. In a separate, smaller bowl, whisk together the wet ingredients: the eggs, vanilla extract, and melted butter until well combined. Pour the wet mixture into the dry ingredients and mix until they are just combined, being careful not to overmix. Gently fold in the white chocolate chips and dried cranberries until they are evenly distributed throughout the thick, somewhat sticky dough.
- Shape the Dough Logs: Lightly flour your hands to prevent sticking. Divide the prepared dough in half. On a baking sheet that you’ve lined with parchment paper, shape each half of the dough into a log. Aim for logs that are approximately 12 inches long and 2 inches wide. It’s important to ensure they are evenly thick along their entire length to promote consistent baking. Remember to leave ample space between the two logs on the baking sheet, as they will spread slightly during the first bake.
- First Bake (Achieving the “Biscotti” Form): Place the baking sheet with the dough logs into your preheated oven. Bake for 20-25 minutes, or until the logs are lightly golden brown around the edges and firm to the touch. Once baked, remove them from the oven and allow them to cool directly on the baking sheet for about 10-15 minutes. This crucial cooling period allows the logs to firm up sufficiently before you attempt to slice them, preventing crumbling.
- Slice and Prepare for Second Bake (The “Twice-Baked” Crunch): While the logs are cooling, reduce your oven temperature to 325°F (160°C). Carefully transfer one cooled log to a clean cutting board. Using a sharp, serrated knife, slice the log diagonally into pieces approximately 1/2-inch thick. Arrange these freshly cut slices, cut-side down, back onto the same parchment-lined baking sheet. Repeat this slicing process with the second log.
- Second Bake (The Crisping Stage): Return the sliced biscotti to the oven for another 10-15 minutes. For even crisping and a uniform golden color, flip the biscotti halfway through this second baking period. Continue baking until they are golden brown, dry, and distinctly crisp. This second bake is precisely what gives biscotti its signature hard, dry texture, making it absolutely perfect for dipping into beverages.
- Cool and Store: Once the biscotti have achieved their desired crispness, transfer them from the baking sheet to a wire rack. Allow them to cool completely at room temperature. They will continue to crisp up even further as they cool. Once fully cooled, store your homemade White Chocolate Cranberry Biscotti in an airtight container at room temperature. They will remain fresh and delightful for up to two weeks.
Expert Tips for Perfect Biscotti Every Time
- Avoid Overmixing the Dough: Overmixing can develop the gluten in the flour too much, leading to tough biscotti. Mix until the ingredients are just combined.
- Ensure Even Shaping: Uniformly shaped logs are critical for consistent baking and an appealing final product. Take your time to shape them evenly.
- Use a Sharp Knife: A very sharp, preferably serrated, knife is essential for making clean, non-crumbling slices after the first bake. Dull knives can tear the biscotti.
- Low and Slow Second Bake is Key: The lower oven temperature and extended baking time for the second bake are absolutely crucial for achieving that characteristic dry, crisp, and crunchy texture without burning the biscotti.
- Get Creative with Add-ins: While white chocolate and cranberry are a delightful combination, feel free to experiment with other additions like pistachios and orange zest, dark chocolate and almonds, or even dried apricots and pecans.
Flavor Innovations for Your Next Biscotti Batch
Once you’ve mastered the basic technique of making biscotti, the exciting possibilities for unique flavor combinations are truly endless. Let your culinary imagination run wild!
- Lemon Poppy Seed Biscotti: Incorporate fresh lemon zest and poppy seeds into the dough for a bright and zesty treat.
- Almond Anise Classic: Add a generous dash of almond extract and a touch of anise seeds for a more traditional, aromatic Italian flavor profile.
- Spiced Pecan Delight: Mix in chopped pecans and a warming blend of cinnamon, nutmeg, and cloves for a cozy, autumnal feel.
- Orange Pistachio Elegance: Combine the zest of an orange with finely chopped pistachios for a vibrant, sophisticated taste and beautiful color.
Storage and Optimal Enjoyment of Your Biscotti
One of the many wonderful qualities of biscotti is their incredible shelf life! These twice-baked cookies are designed to last. Store your homemade White Chocolate Cranberry Biscotti in an airtight container at room temperature, and they will retain their delightful crispness and fresh flavor for up to two weeks. This makes them absolutely perfect for meal prepping your morning treats, preparing ahead for holiday gifts, or having a delicious snack on hand whenever a craving strikes. Enjoy them as intended – dipped into your freshly made Vanilla Caramel Latte, a comforting cup of hot tea, or even a sophisticated glass of dessert wine. Their robust, sturdy texture holds up beautifully to dipping, absorbing just the right amount of liquid without ever falling apart.
The Perfect Pairing: Indulgence in Every Bite and Sip
Imagine this exquisite scenario: a crisp, subtly sweet White Chocolate Cranberry Biscotti, perfectly dunked into a warm, luxuriously frothy Vanilla Caramel Latte. The satisfying crunch of the biscotti, softened just enough by the rich, creamy coffee, creates a symphony of textures and flavors that is simply irresistible and profoundly comforting. This carefully curated combination isn’t just a simple treat; it’s an entire experience – a moment of pure, unadulterated pleasure. It’s the kind of delightful ritual that can effortlessly transform an ordinary morning into a special occasion, or a quiet afternoon into a luxurious escape from the everyday. By mastering these homemade delights, you empower yourself to bring the elegance, warmth, and comfort of a high-end café directly into the heart of your home, all while being effortlessly convenient and surprisingly affordable.
These homemade treats were absolutely amazing and truly reminded me of the artisanal quality and gourmet flavors I’m accustomed to finding in specialty bakeries and high-end coffee shops. They stand as a testament to how simple, quality ingredients, combined with a little love and effort, can yield truly extraordinary results right in your own kitchen.
Enjoy your delightful morning (or afternoon!) treat. You’ve earned this moment of delicious indulgence and culinary creativity.
Looking for more inspiration to plan your next gathering or celebration? Be sure to check out my comprehensive Super Bowl Recipes for crowd-pleasing ideas and game-day favorites!
Need even more recipe ideas for every occasion, from quick weeknight meals to impressive desserts? Explore the comprehensive Recipe Index right here by Mommy Hates Cooking. Happy cooking and baking, and enjoy every delicious moment!